Monday, December 28, 2009

The Sacred Family Recipe...

My family has a secret family recipe. I've always been very proud of this fact. My whole entire life we've only come across one other family who made the same dish. However, even though it's special and unique to our clan, we've never really managed to keep it secret. It's just too good, we have to share it! So, now that I'm officially sharing it with the world wide web, I expect to find many more families who make it. ; )


Scouse (like mouse!)

Day old cornbread
Milk
Electric Skillet

(very complicated, you can see...)

Take your day old cornbread (or, if you're making it just for this meal as I often do, take your fresh cornbread) and crumble it up nicely into an electric skillet. We always use electric skillets because they provide the most even heat and...well, it's just how it's done. Tradition you see. Crumble enough cornbread to evenly fill the skillet. Now pour milk over the top of the cornbread, just enough to moisten and cover it all.


Mmmm...

Now cook the mixture...


(Look at those flavor waves!)


stirring frequently to keep the bottom from burning...


Keep cooking it...


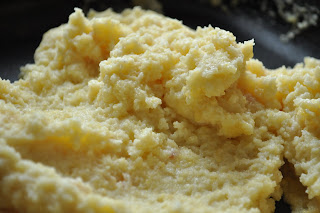
See, it's starting to come together? We want to cook all that milk out and bring it to a nice, creamy, sticky consistency. Sticks to your ribs that way, see?


Hm, now we're talking. See how it came away from the sides and started sticking to itself?


Perfect.


Now dish it out. Don't be skimpy. But, you will be surprised how filling this is. Like I said, sticks to your ribs.


Now you can top your yummy, delicious, scrumptious Scouse with your favorite toppings. I believe the only true and faithful way to eat it is with lots of butter and honey.


My dad thinks it's great with salt and pepper. My mom loves jams and jellies. Some have even been known to use syrup. Personally, I think that's sacrilege, but that's just me.
This simple beauty is perfect for breakfast, lunch, or supper.
Serve it up with some crispy bacon or sausage, eggs, or any other breakfast foods.
Bon appetit!


Sunday, December 13, 2009

When dreams come true

Normally I don’t act on any dreams I have. Mostly because they involve craziness that I definitely don’t need to add to my life. Like pieces of the ceiling falling down on me while I am inexplicably immobile below. Or dreams of babies getting swirlies. (I know…I really have no idea. )
But the other day I woke up thinking about apples and sweet potatoes and how good they would be together. Fried. With butter and brown sugar and definitely cinnamon. So I got up planning on making those that day, and it didn’t even hit me as slightly odd until halfway through the day when I realized…I must have dreamed that. I certainly am not coherent enough in the mornings to consciously plan a brand new recipe. I barely do that successfully when I’m wide awake with a Dr Pepper in me. But at this point I was completely sold on the idea, so I made them anyway. Who says inspiration can’t strike during REM? I mean, think about it, maybe our most brilliant moments actually occur while we are deeply asleep, and we’re just never aware of them? It could happen. Anyway. I tried it, and I was so pleasantly delighted with what I ended up with! I loved the tart-sweetness of the apples and the starchy-sweetness of the sweet potatoes. The different textures blended wonderfully too. Soft and tender apple with the (again) starchy firmness of the potato. And of course, brown sugar, butter, and cinnamon taste good with anything. Who knew dreams came true!!


Sweet Fried Apples and Taters

1 large sweet potato, peeled and cubed
2 pink lady apples, cored and cubed (not peeled)
1 stick of butter
½ cup of brown sugar
Cinnamon

Melt 4 tbs of butter over medium heat in a skillet. Add cubed sweet potatoes and cook, stirring occasionally, until potatoes start to become tender, about ten minutes. Add the cubed apples and cook until both potatoes and apples are nice and tender, but not mushy, about another ten minutes. Sprinkle generously with cinnamon and stir to combine. In a separate small pan (or just in a bowl in the microwave) melt together the other four tbs of butter and brown sugar. Once melted together, stir into skillet. Allow it to melt and simmer for a few more minutes, until the sauce reaches a nice consistency. Serve warm and delicious.
Note: This would be great on the grill! Just combine all ingredients in a foil packet and grill until tender. You could probably cut back on the butter just a tad, since it’s all getting cooked together at once.

Friday, November 20, 2009

Em-panadas


This is one of my husband’s very favorite foods. Which must mean I’m doing SOMETHING right. He is definitely not a picky eater. When he says he’ll eat anything, he pretty much means it. So, usually, he likes pretty much anything I make. But when he requests it, that’s when I know it’s good.
This is actually very simple. For my filling I use my cheesy chip dip, and the crust is that amazing pie crust I just raved about. Usually when I make this I only make four. We will usually each eat one for supper and then have one each for leftovers. They reheat pretty well in the oven. Not as great as the first time around, of course, but definitely decent leftovers.


Em’s Empanadas
Serves 8
2 PW Perfect Pie Crust
1 beaten egg (for egg wash)
1 lb. browned hamburger
8 oz. cream cheese
8-10 oz. velveeta
1 12 oz. jar of your favorite salsa (I personally love On the Border)

(Please note: these proportions are really to taste- maybe you want yours cheesier or more salsa-y or with more meat…feel free to mix it up)

For my chip dip I will usually mix all of the ingredients in a crockpot and let them simmer for a few hours, but usually when I’m making empanadas I don’t waste time on that, so I just use the microwave. Mix hamburger, cheeses, and salsa in a bowl and microwave until creamy and smooth. Adjust proportions according to taste.
Cut each rolled out pie crust into fourths. Spoon a generous spoonful of filling onto a fourth (I must warn you…you will be sorely tempted to put in more filling then the crust can handle…I know cuz I do this every single time. Nothing horrible will happen, it will just ooze out and not fit perfectly when you try to fold up the crust. And your empanada won’t be as pretty. I myself have resigned myself to this fact. I just want more filling.) Fold the pie crust over and pinch edges to seal. Brush with beaten egg.
Bake at 350 for 15-20 minutes, or until golden brown. Serve plain, or with extra filling on the top, or with salsa and sour cream…or whatever makes your skirt fly up. : )

Thursday, November 19, 2009

Toasty golden, dreamy creamy...


What says childhood more than a good old PB&J? Everyone has their own perfect version of this sandwich. Maybe your mom always cut your crusts off, or made it with grape jelly and crunchy peanut butter, or cut it diagonally. Now that we’re all grown up, everyone still has that craving for a good dose of peanut butter and jelly. While my Mom never made them this way, I have perfected my own version. I like mine grilled. Yes, grilled like cheese. It’s so nice and toasty and creamy and melty…it creates a completely different flavor while still having that classic comfort. Try it sometime!


Grilled PB&J

Your favorite sandwich bread- Personally, I looove Sara Lee Soft and Smooth
Your favorite peanut butter- I like natural peanut butter, creamy
Your favorite jam/jelly- I used homemade apricot jam and I think the sweet/sour balance is perfection
1 Tbs soft butter

Make a good old PB&J sandwich, whichever way you like best. Heat a dab of butter in a skillet over medium heat. Spread butter on both outsides of the sandwich. Grill the sandwich on each side until toasty golden on the outside


and dreamy creamy on the inside.


Cut diagonally, straight across, crustless, or even leave it whole. However Mom used to make them. Eat it while it’s hot!

Wednesday, November 18, 2009

Soda Shop Sandwich

When I was a kid this new shop opened up downtown. It specialized in old fashioned drinks, like phosphates and green rivers, along with good old everyday fare. My older sister worked there for awhile. I still remember this was my favorite meal to order. Ham and Cheese on a bagel. With cream cheese. And avocado. Yum. Here’s my rendition.


Ham and Cheese Bagel
1 Bagel
5-6 slices of deli ham
Cream Cheese
3-4 slices of avocado

Lightly sauté the ham slices in a skillet, until they have a nice color and are warmed through. Toast the bagel. Spread cream cheese on each side of the bagel. Layer on ham slices. Top with fresh avocado slices. If desired you can also add slices of red onion.


I also had sauteed mushrooms and sugar snap peas on the side. This is one of my favorite veggies sides, and simple too! It is my ultimate favorite way to eat mushrooms. The key here is to get them nice and crispy…not burned, but just crispy. And delicious. I could eat this as my vegetable side dish every day.


Sugar Snap Peas and Mushrooms

Frozen sugar snap peas, thawed
White button mushrooms
Minced garlic
Butter
Sea Salt

Melt 2-3 tbs of butter in a skillet. Add minced garlic, mushrooms, and peas. Let sauté for a few minutes, stirring to keep from burning. Sprinkle with sea salt. Continue sautéing until the peas are cooked through and mushrooms are slightly crispy. Serve hot.

Tuesday, November 17, 2009

Yums...I mean yams.


Have I mentioned before that sweet potatoes are pretty much my most favorite vegetable ever? Yeah. They’re good. And they’re so good for you! Seriously. They’re packed with vitamins, fiber, and antioxidants. And they taste soo good. How can you not like sweet potatoes? Anyway. I like to try to come up with new ways to eat this fantastic veggie, but sometimes the simplest ways are the best.
(I should warn you. I am a avid adherent to the dump’n’taste method. So, as in so many of my dishes, I didn’t measure anything. I just dumped it in til it looked right-and tasted right. I also only did this with two potatoes. So I’m totally estimating on measurements…feel free to alter to taste!)


Creamy Mashed Sweet Potatoes
Serves 6-8
6 large Sweet Potatoes
1 to 1 ½ cups Brown Sugar
½ cup of Heavy Cream
1 stick of Butter
1 tsp. Cinnamon
Dash of salt
Boil peeled and quartered potatoes until tender (they should be break-when-stuck-with-a-fork-tender.) Drain the water and roughly mash the soft potatoes. Add butter, cream, brown sugar, cinnamon, and dash of salt. Continue to mash until the potatoes are a nice, creamy consistency. TASTE them. Make sure everything is proportioned correctly. Add sugar, butter, cinnamon, whatever. Die of the deliciousness.

Monday, November 16, 2009

What? Pie crust?


I just haaaapened to have some extra pie crust just laying around here the other day, begging to be used. And some extra ricotta. And nutella. I had run across a ricotta/nutella calzone recipe a couple years ago, but hadn’t loved it enough to try it again. But then the thought hit me, what if it were in a PIE CRUST instead of bread dough? Now that I like. So I tried it (and of course, tweaked.) And it was good! Very sophisticated too. And kind of Italian. Even if it wasn’t a real calzone.


Ricotta Nutella Tartlets
Serves 4
1 PW Pie Crust (Of course.)
¾ cup of ricotta cheese
¼ cup cream cheese, room temp
1 egg, separated
2 tbs. powdered sugar
2/3 cup nutella
3 tbs heavy cream


Preheat oven to 450.
Blend ricotta, cream cheese, powdered sugar, and egg yolk in a small bowl. In another small bowl whisk together nutella and cream. Divide your pie crust into fourths and roll out into circles (or whatever shape you so desire.) Into each round spoon a generous spoonful of ricotta filling topped with a dollop of nutella. Fold the other half of the crust over and pinch edges to seal. Careful not to tear! Beat the egg white and brush over the tops of the tartlets. Bake for 15 minutes, or until golden brown. Cool slightly, then serve warm. If desired, top with strawberries and whipped cream, or simply a drizzle of nutella sauce.

Sunday, November 15, 2009

Balsamic Buttons


Mushrooms. Those little buttons are just so versatile. They can be sautĂ©ed, they can be baked, they can be stuffed, sliced, stuck on a pizza, tossed in a salad, eaten straight out of the bag. They’re just good. My favorite way to eat them is sautĂ©ed up with sugar snap peas. But another great way is stuffed with cream cheese and drenched with balsamic vinegar. Balsamic is my favorite vinegar. I once had a crème brule at a (faaaancy) restaurant with strawberries with a white balsamic vinegar reduction. Oh my. Ever since I have been dying for a crème brule set and a bottle of white balsamic, just to try my hand at it. Ahem, Christmas? Yes. Anyway. Back to mushrooms.


Stuffed Balsamic Mushrooms

24 white button mushrooms

6 tbs balsamic vinegar

½ cup extra virgin olive oil, divided

Sea salt

1 cup of Italian bread crumbs

1 cup fresh grated parmesan (don’t get me started on the virtues of good, fresh parmesan…I used to buy the pre-grated-Pizza Hut kind, but seriously, a block of parmesan cheese lasts FOREVER. And you can use it in soo many different things. Not to mention it’s like a million times better. But anyway. Back to mushrooms.)

24 cubes of cream cheese (um, 4 oz? 8? I don’t know…probably closer to 8)

Preheat your oven to 425.

Clean mushrooms and remove stems. Toss mushrooms in vinegar and ¼ cup of olive oil. Sprinkle with sea salt. Place on a baking dish and roast in the oven for 10-15 minutes. Remove and cool to room temp. Mix bread crumbs, parmesan, and the other ¼ cup of olive oil in a small bowl (note: if you want to, you can finely chop the mushroom stems and add them to the bread crumbs.) When mushrooms are cool place a cream cheese cube in each mushroom cap, then cover with a spoonful of bread crumb mixture. Pop back into the oven for 5-6 minutes, until cream cheese is melty and bread crumbs are toasty. Serve and enjoy!

Saturday, November 14, 2009

Mozzarella!!


I think I’m in love with pie crust. It’s just so GOOD. And things taste so good inside of it. I crave pie crust, so I start thinking about things I could put in it, just so I have a reason to use it. I think I was better off when I couldn’t make pie crust. This tasty little tart is great for a girl’s night in or brunch or something. I had it when I had an evening to myself to experiment. It’s nice and light, yet filling. And satisfies that need for mozzarella. Yummo! It’s also very versatile. You could fill it with whatever your heart desires. I chose bacon, sundried tomatoes, basil pesto, and fresh mozzarella. But you could add chicken, goat cheese, mushrooms, fresh tomatoes, artichoke, whatever. So, go forth and be creative!


Fresh Mozzarella Tart
Serves 2-3
1 PW Pie Crust
4-6 slices of bacon
Sundried tomatoes
Basil Pesto (I just use that stuff you get at Wal-Mart. Quite tasty.)
Fresh Mozzarella, sliced
First cut the bacon up into small pieces and fry in a pan until nice and done and crispy- but not too dark. (That’s kind of hard to do. I ended up only using half of mine, since the other half burned to a crisp. But I knew that would happen. So I made double the bacon. But hopefully you’re less bacon handicapped than I am. I love bacon but just have the stinkin’ hardest time cooking it perfectly. Aaaanyway…) Drain the bacon pieces. Cut your pie crust into two or three pieces, depending on how big you want your tart to be. You could even make them smaller if you wanted. Roll those pieces out into nice round crusts. Spread a spoonful or two of pesto on the bottom of your crust (being careful to leave an inch or two of crust edge to fold over at the end.) Sprinkle on your bacon, sundried tomatoes, and a couple slices of fresh mozzarella (enough to cover the top.) Fold up the sides of the crust, leaving the middle uncovered (you know, like a tart. Right.) Drizzle another spoonful of pesto on top. Bake at 350 for 20-25 minutes or until crust is golden brown.


Friday, November 13, 2009

Perfect Pie Crust

This is literally the best pie crust recipe I have ever come across. And I have soo much trouble with pie crust. My mother makes amazing pies. Her crust is always flaky and tender and flavorful. When I try to make pie crust it turns out too dry or too sticky or not tender or way too flaky...I just don't have the knack. But this crust! It's soo easy. And! The very best part- you make it ahead and keep it in the freezer. Soo handy. I love handy. And it's tender AND flaky AND flavorful. Just like Mom's. I have several posts coming up that feature this handy crust, so I figured it would be more convenient to devote an entire post to this recipe, so I can just reference it.

PW's Perfect Pie Crust

Sunday, November 8, 2009

My Man Chef


This is all my husband's doing.


He had these once at a friend's house and has been crazy about them ever since. I was skeptical at first, but these Deep Fried Oreos are really rather tasty! You'd be surprised what hot grease and batter can do to something. But don't eat too many in one sitting. The grease kinda gets to ya. ; )


Jer's Deep Fat Fried Heart Attack

1 egg
2/3 cup milk
2 tbsp. sugar
1 1/4 cup flour
1/4 tsp. salt
1 tsp. baking powder
Double Stuf Oreos (double stuf is important...regular oreos just aren't good enough after double stuf!)


Mix all ingredients (except oreos...duh) into a nice smooth batter. Heat oil in a skillet or a fry daddy (these work the best) and then dip oreos in the batter. Fry, turning once, until golden brown. Cool slightly, then devour!

If you want, you can even try a double decker ; )


Tuesday, November 3, 2009

Carnival Squash and Fried Chicken!

My dear, sweet husband gave me The Pioneer Woman Cooks for my birthday. : ) I was very excited. Of course, I read through it right away. The most intriguing recipe for me was the fried chicken. Oh, it looked so yummy and crispy and perfectly delicious. And I have never been able to make fried chicken. Ever. It always burns on the outside and doesn't cook on the inside, or the breading falls off in the oil, or something. So this recipe, which has you fry the chicken until it's nice and browned and then bake it in the oven to finish cooking it, looked very promising. I made it the other night for my husband (along with her buttermilk biscuits and some creamed corn) and it was so yummy! I was so very excited to finally be able to make fried chicken! It just seems like the quintessential homemaker meal. I feel like a real wife now. : )


I also made my carnival squash.


I decided to just butter and salt it and roast it in the oven. It was...interesting. It wasn't quite what I expected. Not terribly sweet. Anyway, it was fun to try either way.


The Pioneer Woman's Fried Chicken

2 cut-up fryer chickens
1 quart plus 1/4 cup buttermilk
5 cups flour
3 tbs seasoned salt
2 tsp black pepper
2 tsp dried thyme
2 tsp paprika
1 tsp cayenne pepper, or to taste
1/4 cup of milk
Canola or vegetable oil for frying

Rinse chicken and cover with the quart of buttermilk. Soak in the fridge overnight. When you are ready to fry, set on the counter for 30 minutes to take the chill off.
Preheat oven to 350. Mix flour and seasonings in a large bowl. In a small bowl combine the 1/4 cup of buttermilk and the milk. Pour the milk mixture into the flour and with a pastry cutter gradually mix until there are little lumps throughout. This will adhere to the chicken and make for a crispier breading. If necessary, add a little more flour or milk to make it slightly lumpy.
Heat 1 1/2 inches of oil in a deep skillet over med-high heat until a thermometer reaches 365. Lower the heat slightly, if needed to keep the oil from getting hotter.
Thoroughly coat each piece of chicken with the breading, pressing extra breading onto the chicken if necessary.
Add the chicken to the oil three or four pieces at a time. Make sure they aren't sticking together, the cover the pan and fry for 5-7 minutes, checking occasionally to make sure the chicken isn't getting too brown.
Turn the pieces over, cover again, and cook 3-5 minutes more. All the while monitor the temperature of the oil to make sure the chicken doesn't burn.
Place the chicken on a baking sheet and bake the chicken for 15 minutes to finish the cooking process. Make sure to check the chicken to see if it's cooked through.